Books, Activities and Games Store

Bagful of Joy :)

Paper Flowers

This Diwali,  decorate your home with something new and creative crafted by you or your kids!

Adorn your drawing-room or living room with these gorgeous handmade flowers which are colorful and very easy to make.

Material:

  1. Tissue Papers (Red, Pink, Purple, Green, White)
  2. Stem Wire
  3. Floral Tape (Purple, Red, Pink, Green)
  4. Thread
  5. Scissors
  6. Pencil
  7. Gum

Method:

  1. First of all, cut the Pink tissue papers in the shape of petals.
  2. Make 25 petals for flower.
  3. Now cut the green tissue paper in the shape of leaves.
  4. Now take some stamens and wrap it on the wire stem with floral tape.
  5. Now attach the leaves to the flower stem with thread and wrap the stem with a green color floral tape with the help of gum.
  6. A flower stem is ready and same is directed for rest of the flowers.
  7. You can also place them in a vase.

Enjoy this fun-filled activity at home or visit B.A.G.S where you will find all the required material for this while you can have an amazing day doing a lot more creative and exciting activities.  The lively aura of our store would add unique spark to your creativity.

Visit our stores at:

Basement, Jajoo Towers, A-7/9, Hawa Sarak, Jaipur and

402, Gali No. 3, Banipark, Jaipur, Rajasthan

Leave a comment »

10-minute craft idea

We love to read books but due to tight schedules, we leave them mid-way. And when we open the book again, that tough time remembering the point you left at. Sure, bookmarks are a solution. So how about making one on your own? This quick and easy weekend project is perfect for on-the-go crafty peoples.

Supplies:

A leaf

Card stock (in shape and size you prefer for your book mark)

Laminations film

Paper- punching machine

Ribbon

Instructions:

The best thing about this craft idea is there are absolutely no glitches. J

Collect a leaf from your garden and stick it to the piece of card stock, sized for your bookmark. Cover up with the lamination film, so that the leaf does not get spoiled. Punch a hole on the top with a paper-punching machine and finish off with a ribbon at the top.

Find more such ideas and craft supplies at Books, Activities and Games Library and Store (BAGS):
Hawa Sadak- Basement, Jajoo Towers, A-7/9, Hawa Sadak, Jaipur.
Raja Park- 402, Gali No. 3, Raja Park, Jaipur.
Call- +91-0141-2219096, 2620611.

Leave a comment »

Dog flowers from paper craft

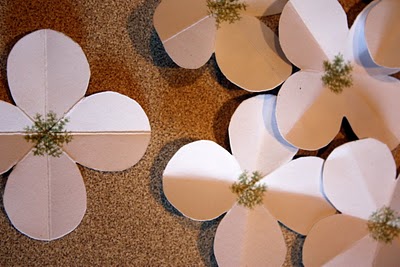
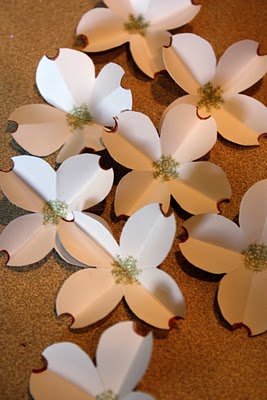
The art of Paper folding and cutting is certainly not new. But the creativity it offers is limitless for sure. Books, Activities and Games Library and Store (BAGS) show you how easy it is to create beautiful dogwood blossoms out of something so simple: paper.

Supplies:

  • White card stock
  • Paper cutter
  • Scissors
  • Hole punch (standard)
  • Distress Inks (Ivy and Sepia tones)
  • Rubber stamp

Instructions:

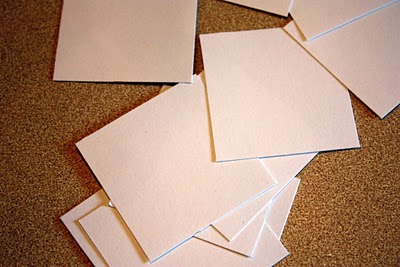
Fold your squares into quarters to get nice and crisp folds.

Open the square back up, and fold corner to corner, just using your hand to crease, this gives a softer look to the petals.

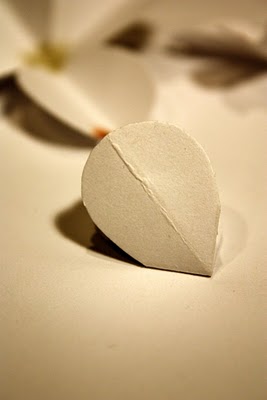
Fold the paper back into a square. Hold the square on the diagonal and cut the “corners” off, creating a teardrop shape.

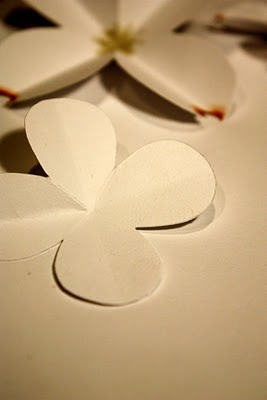
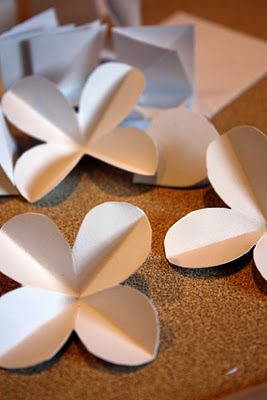
Open your paper to reveal your almost dogwood!


When you’ve finally cut out as many as you want, it’s time to make it look real! Using a rubber stamp with distress ink (Ivy), stamp on the center of your dog flower cut-outs.

Then using a standard office hole punch, clip all four petals and then ink it using sepia ink. And your dog flowers are ready!

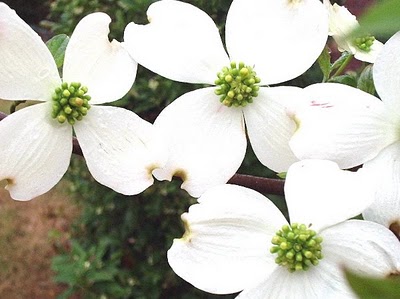
If you need more inspiration, study the actual flower.


Find all the supplies and more craft ideas at

Books, Activities and Games Library and Store (BAGS):
Hawa Sadak- Basement, Jajoo Towers, A-7/9, Hawa Sadak, Jaipur.
Raja Park- 402, Gali No. 3, Raja Park, Jaipur.
Call- +91-0141-2219096, 2620611.

Leave a comment »

Egg carton cactus craft

Isn’t this egg carton cactus craft just the cutest little crafty cactus you’ve ever seen? It’s also the easiest craft project we’ve shared till now. Learn to make on your own with recycled products. Books, Activities and Games Library and Store (BAGS) bets that it would take less than two hours to complete.

This cactus is actually quite small, as we only used the tips of the egg carton, though one could make is just a bit bigger, depending on the type of egg cartons you have.

Supplies:

  • recycled egg cartons
  • recycled cardboard for the base
  • Fevicryl Hobby Ideas paint
  • Fevicryl craft glue
  • tissue paper- orange or yellow
  • tiny rocks or pebbles

Instructions:

  • Cut up your egg carton, such that the square portions are the portions to be used. Cut lots of little square pieces and have the kids glue two together with craft glue.
  • Once dry, paint the little pieces, and once dry, use hot glue(mix hot water and craft glue in 1:1 ratio, and apply using a brush) to assemble your cactus.
  • Have kids make tiny orange cactus flowers with tissue paper and adhere with glue.
  • Glue a ring of rocks around your cactus.
  • Sit back and admire your new not so prickly friend!

Find Books, Activities and Games Store at:

Hawa Sadak- Basement, Jajoo Towers, A-7/9, Hawa Sadak, Jaipur.

Raja Park- 402, Gali No. 3, Raja Park, Jaipur.

Call- +91-0141-2219096, 2620611.

Leave a comment »

Paper Mache Birds.

Paper Mache is one such art that can be used to create anything you can imagine of. At Books, Activities and Games Library and Store (BAGS), we explored the possibilities of it to form life-like figurines of tiny, chirpy birds.

They have wire feet which allow you to clamp them on an edge like a flowerpot or piece of driftwood or have them free standing.

SUPPLIES:

– newspaper
– tape
– paper towel
– tacky glue
– water and recycled container
– thin cardboard from a cereal box
– wax paper
– Fevicryl Hobby Ideas acrylic paint
– fine markers
– Mod Podge
– gauge wire
– Yarn

Instructions:

  • Take a quarter sheet of newspaper and crush into a pear shape.
  • Tape into place. You can twist out a beak shape like we did. Cut some paper towel into strips about 1/2 an inch wide or so.  Pour some white school glue into a recycled container and add water in a 1 to 1 ratio. Mix well. Dip the strips into the glue mixture and start covering your bird. With paper mache you want to overlap your strips for strength and smooth them down as you go.  Use a few dry strips to soak up excess glue.  That way your bird will take less time to dry you just want it moist not sopping.
  • Leave to dry in a warm place overnight, turn once to ensure even drying. Out of thin cardboard from a cereal or cracker box cut out a wing shape.  Cut out a tail shape as well.
  • Take the cardboard shapes and cover in a coat of paper mache.
  • Once they are covered attach to the bird with overlapping strips.  While the shapes are moist you can curl your wings if you wish.
  • Leave to dry. Paint with acrylic. We used a base-coat first and then added additional color on top. For the feather and eye detail use markers after the paint has dried.
  • If you want a shiny coat you can add a coat of mod podge but you might want to wait until after you add the legs.  This way it can stand up while drying.
  • To make the feet take piece of wire about 16 inches or so.  It’s soft enough to bend with your fingers but firm enough to hold the shape without collapsing.
  • Make a foot shape with 4 toes and then twist the 2 ends of the wire together to form the leg.
  • Trim them down and bend in the knees.  Remember a bird’s knee bends backwards. (Well not really it just seems that way, it really is the ankle but their foot is elongated so it looks like the knee)
  • To add some color to the legs, we wrapped them with yarn.  Take the end of the thread and loosely wrap from the top of the leg down, double back and wrap tightly now. When you reach the top, knot off.
  • Using a knitting needle to punch holes for the legs. (Here, you may need adults’ supervision).
  • Put some tacky glue on them.
  • Push the leg thru the glue into the hole (remember the knees are backwards).
  • Let dry.
  • That’s it. They look pretty realistic once the legs are on.

Find Books, Activities and Games Store at:

Hawa Sadak- Basement, Jajoo Towers, A-7/9, Hawa Sadak, Jaipur.

Raja Park- 402, Gali No. 3, Raja Park, Jaipur.

Call- +91-0141-2219096, 2620611.

Leave a comment »

Turn your toddler’s artwork into a masterpiece

Every kid loves to mess around with a little poster paint, right? But there are two major problems with a toddler’s artistic expressions-

Problem # 1: It usually makes a mess

The Fix: Strip the child to diaper/underwear, and place them somewhere that’s not close to carpet, so that they don’t make a mess of their clothes and room furnishings.

Problem #2: The “masterpiece” is usually not something you want hanging around the house because.. well…ahem-ahem…it’s done by a toddler! 🙂

The Fix: This brilliant idea!! Make a Masterpiece out of your child’s “masterpiece”!

Supplies:

  • Canvas
  • Glue
  • Mod- Podge
  • Your Child’s Art
  • Scissors
  • Paint

Instructions:

  • Paint the entire canvas in your choice of color, let dry.
  • Cut your child’s artwork into shapes (circles, squares, etc.) and glue them lightly to your canvas in whatever design you prefer. Allow to dry.
  • Mod-podge the whole thing to secure the artwork and give it a finished look.
  • Dry and Done!!

Find Books, Activities and Games Store at:

Hawa Sadak- Basement, Jajoo Towers, A-7/9, Hawa Sadak, Jaipur.

Raja Park- 402, Gali No. 3, Raja Park, Jaipur.

Call- +91-0141-2219096, 2620611.

3 Comments »

Craft Ideas- Crepe paper jellyfish!

Here’s a fun under-the-sea craft that little ones can do- Make a crepe paper jellyfish.

Depending on your little artist’s age, you can make this project simpler or more elaborate.

Supplies:

  • Cupcake liners
  • Crepe Paper
  • Glue
  • Needle and thread

Instructions:

  • Start with two cupcake liners stacked together to form the base of your jellyfish. Use two liners to make it a bit stiff and strong. Thread your needle and poke the needle up through the cupcake liners.
  • Cut rounded-edge strips of crepe paper and stick them onto the needle. For smaller children you can just glue them on. Once you are done covering the cupcake liner with the crepe paper strips, poke the needle back through creating a loop to hang your jellyfish. Tie off the bottom of the threads.
  • Cut various lengths and widths of crepe paper to form the tentacles.
  • Flip the cupcake liner over and start gluing the strips of crepe paper to the inside. Allow the glue to dry thoroughly.

Hang your jellyfish and let the tentacles flutter in the breeze (or ocean current).

And the best part is these sweet jellyfish don’t sting!

Find us for more craft ideas and assistance at Books, Activities and Games Library and Store (BAGS):

Hawa Sadak– Basement, Jajoo Towers, A-7/9, Hawa Sadak, Jaipur.

Raja Park– 402, Gali No. 3, Raja Park, Jaipur.

Call- +91-0141-2219096, 2620611.

(Source: http://carolynshomework.blogspot.in/)

Leave a comment »

Craft Ideas- Egg Carton Spy Glasses

Egg Carton Spy Glasses

When children are young their minds are full of wonder. Feed off that adventurous nature and encourage imaginative play by making these fun spy glasses! They’ll love threading the beads and bending the stems into place. Look out James Bond, there’s a new spy in town!

Encourage your little ones to use their imagination, while they are still young enough to be blessed without a care in the world! 🙂

Supplies:

  • 2 cardboard eggcups
  • 3 blue pipe cleaners
  • 19 blue pony beads
  • 14 yellow pony beads
  • 14 green pony beads
  • Green and yellow paint
  • Scissors
  • White craft glue
  • Toothpick

Instructions:

  • Trim the egg carton cups with scissors and cut a hole in the bottom of each one for the eye openings.
  • Paint the cardboard eggcups green and allow them to dry. Paint yellow stripes around the eggcups and allow them to dry.
  • Cut a 3-inch piece from one of the pipe cleaners; set the remaining section aside for another project.
  • Use a toothpick to poke a hole in the side of each eggcup to accommodate the nosepiece. Thread one end of the 3-inch pipe cleaner into one of the holes and bend the end inside the cup to hold in place. Thread 5 blue beads onto the pipe cleaner. Poke the open end through the other eggcup and bend to secure.
  • Use a toothpick to poke a hole on the opposite side of each eggcup to accommodate the arms of the eyeglasses. Insert one end of a pipe cleaner into the hole. This will be long, so pull enough through to allow room at the end to curve around your child’s ear. Twist the pipe cleaner together.
  • Thread beads onto the pipe cleaner, leaving the ear hook open. Bend the very end of the pipe cleaner to “hide” the pointy end so that it doesn’t cause discomfort. Repeat for the other arm.

Find out more such ideas and assistance at Books, Activities and Games Library and Store (BAGS):

Hawa Sadak- Basement, Jajoo Towers, A-7/9, Hawa Sadak, Jaipur.

Raja Park- 402, Gali No.3, Raja Park, Jaipur.

Call- +91-0141-2219096, 2620611.

2 Comments »

DIY Lighting Bugs

Lightning bugs or fireflies always have a magical essence about them as they light up in the darkness. We have heard of them so much, seen them in movies, read about in books and some of us have even chased them as kids. Unfortunately, lighting bugs are not seen any more so we thought to create them for ourselves. During the day, these little lightning bugs are so cute to leave in the backyard and by night, watch your kids’ faces light up as the plastic fireflies begin to glow! This is one of our favorites and we bet you’d love it too.

Supplies

  • LED tea light
  • Plastic Easter egg
  • Fancy plastic/woolen sticks
  • White sticky labels
  • Silver duct tape
  • Black marker

Instructions:

  • Poke holes through the eggs using thumbtack to insert pipe cleaners for antennas and legs.
  • Use white sticky labels for the eyes and black marker to draw them.
  • Use silver duct tape for the wings. Cut into heart shape or two ovals.
  • Pop the LED tealight into the eggs.

Isn’t it easy? It takes less than 10 minutes to make one and if you get struck at any point, come over to us at Books, Activities and Games Store. We would be glad to help you.

Find us at:

Hawa Sadak- Basement, Jajoo Towers, A-7/9, Hawa Sadak, Jaipur.

Raja Park- 402, Gali No. 3, Raja Park, Jaipur.

Call- +91-0141-2219096, 2620611.

Leave a comment »

Magazine Holder from Cereal Boxes

Books Activities and Games Library and Store loves books and lots of books. But, storing them can be a bit tricky. So, we came up with a easy-to-make books and magazine holder.

Supplies:

Large Cereal Boxes

Scissors

Mod Podge (matte finish).

Paint brush

Scrapbook  paper- 3 sheets of 12×12 scrapbook paper.


Instructions:

Essentially this is all just a little cutting, gluing and folding. Who doesn’t love cutting and glue?

Cut the top flaps off your box.

Now trace the shape you want for your magazine folder. You want at least 5 inches at the bottom and 3 inches at the top to hold your magazines securely. Your total height should be at least 11 inches. You can use a curved shape or a straight edge.

Mod Podge.

Once you have your basic shape, paint a layer of Mod Podge on the box and lay your paper on top of the glue. Leave a bit of space on the shorter end so that when you do the other side the pieces will meet.

Adjust the Corners.

To fold the corners simply use your scissors to cut a slit right at the corner and fold both pieces in. Mod Podge all the edges as you fold them in.

Complete the box side.

Measure your box side and choose the width of your strip. Cut the strip and Mod Podge it on, folding over at the top and bottom. Cover your entire magazine holder with another layer of Mod Podge. It is not only glue but also a sealer. When your magazine holder is dry it will be smooth and ready for your magazines and books!


Find us at Books, Activities and Games Library and Store (B.A.G.S.):

Hawa Sadak- Basement, Jajoo Towers, A-7/9, Hawa Sadak, Jaipur.

Raja Park- 402, Gali No. 3, RajaPark, Jaipur.

Call- +91-0141-2219096 or +91-0141-2620611.

1 Comment »